A. General Information
1. Error Source: Instrumental
All measurement equipment, from steel tape to total station, is subject to maladjustment. The most conscientious personnel measuring in the best environmental conditions will obtain poor results if they do not know how to compensate for equipment maladjustment.
Because it originates with the equipment, maladjustment's error source is Instrumental. If consistent, it is generally systematic which means there is some way it can be eliminated. If inconsistent, the instrument cannot be used to measure reliably and may need to be sent to a repair facility.
Maladjustment compensation can usually be by procedure, math, or equipment adjustment. Measurement procedures generally incorporate maladjustment compensation so equipment can be reliably used even if not in perfect condition. However, some maladjustments cannot be eliminated by procedure. Some might be compensated mathematically, but others could require physical adjustment.
For each measurement device or group, primary maladjustments are identified and how they can be addressed described. Measurement procedures in other topics are heavily based on the information in this topic. Even if you are not going to physically adjust your equipment, these principles help explain why we measure the way we do.
2. Reversion
A single measurement can not reveal maladjustment presence. Nor do multiple measurements if incorrectly done. One potential way to determine if equipment error exists is by Reversion. Reversion is based on reversing the geometry of a particular instrument condition between repeated measurements. This has the effect of allowing us to see twice the error present in that condition.
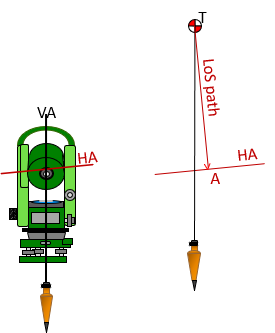
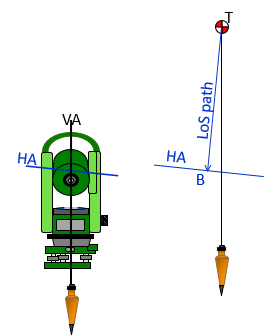
For example, Figure A-1 shows the effect of a Total Station Instrument (TSI) with a Horizontal Axis (HA) which is not perpendicular to its Vertical Axis (VA).
With the instrument set up and leveled, point T is sighted, and then the telescope is rotated to horizontal, Figure A-1a. The telescope, along with Line of Sight (LoS), is constrained to rotate about the HA. Because the HA is inclined up to the right, the LoS rotates to point A which is right of vertical.
The instrument is rotated horizontally 180° which causes the HA to be inclined up to the left, opposite of the previous condition. Point T is sighted, the LoS is rotated to horizontal, winding up at point B, left of vertical, Figure A-1b.
 |
 |
| a. First pointing | b. Second pointing |
| Figure A-1 Horizontal Axis Maladjustment |
|
For each pointing, the angle between the LoS path and vertical is the amount the HA is inclined.
Figure A-2 shows both LoS paths superimposed.
 |
| Figure A-2 Both Pointings |
Point C is vertically below point T and is located halfway between points A and B; the distance between points A and B is twice the HA error.
Once a maladjustment is identified, its effect can be compensated by procedure, adjustment, or computation. Because it can be compensated, an error revealed by reversion is systematic.
Reversion is an important concept because using it during measuring can automatically cancel some systematic instrumental errors. Learning a measurement science includes learning processes that minimize errors and provide them opportunity to compensate.
Reversion does not, however, work in all situations. Consider a repaired steel tape that has one foot removed between 43 and 45 feet. Measuring a line longer than 43 feet forward, Figure A-3a, and backward, Figure A3b, will always be one foot too long.
 |
| a. Forward measurement |
 |
| b. Reverse measurement |
| Figure A-3 Tape with Missing Foot |
Measuring a distance shorter than 43 feet will not be affected by the missing foot.
The missing foot is a systematic instrumental error but it cannot be compensated, nor revealed, by reversion.
3. Check and Adjust
There are a few things to keep in mind and some cautionary notes for surveyors who will attempt adjusting equipment.
Where multiple checks and adjustments are described, perform them in the order presented. Some checks are dependent on others already being compensated otherwise maladjustment may be difficult to isolate.
Before making an adjustment, repeat the check to see if it is consistent. If it isn't, then either the check was not performed correctly, a previous adjustment or compensation was not done, or it is not systematic and should be sent to a repair facility.
Modern equipment, when treated with care, maintains physical adjustment quite well. In some cases, electronics compensate for maladjustments. An instrument's operating manual will describe specific checks and adjustments which can be made. While some adjustments can be performed by the surveyor, most are best left to qualified repair facilities. Equipment cost and complexity, particularly those with onboard electronics, require specialized equipment and conditions. Trying to repair maladjustment on your own can make the situation worse, if not disabling an instrument entirely.
Because they are a large capital investment and critical to a surveyor's livelihood, a formal maintenance program should be adopted for each major instrument. This should include an annual trip to a repair facility for cleaning and adjustment. Consider this preventative maintenance.
So if adjustments on your own are not encouraged, why include this topic?
- Understanding instrumental error determination helps new surveyors appreciate why we use particular measurement processes.
- There are some pieces of equipment the surveyor should check and adjust on a routine basis. A few of these tend to slip between the cracks, but their importance should not be overlooked.
Never assume an instrument is in perfect adjustment allowing you to cut corners when measuring. Rather, assume it is maladjusted, and use procedures which compensate error if it is present.
4. Maladjustment Check Conditions
To ensure correct maladjustment identification, environmental variables must be removed or controlled. For best results, perform checks under these conditions:
- Windless, cloudy day
- Comfortable temperature
- Flat area, dry firm ground
- Do not set up on or near pavement
- Set up away from traffic
- Ensure a stable setup (see Tripods section in Chapter B).
Document results including:
- Equipment identification
- Personnel
- Date
- Environmental condition
- Check performed, results, and corrective action taken