{KomentoDisable}
B. The Basic Stuff
1. Introduction
These are the "unglamorous" equipment that can significantly affect measurement quality. Because they are simple devices, their adjustment is often ignored, even though they tend to take a beating. Checking and adjusting each is quick and simple and should be performed on a routine basis.
2. Tripod
A tripod provides a stable base for various instruments. Loose or missing hardware can adversely affect measurements.
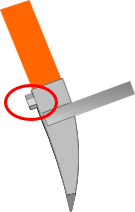
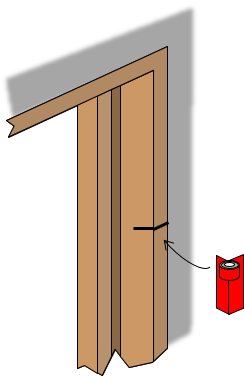
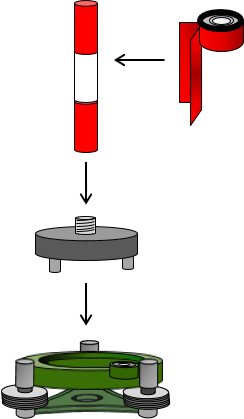
a. Leg Attachment
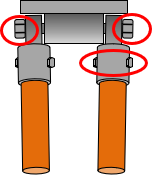
Legs attached with screws, bolts, or rivets to brackets which in turn attach to the tripod head with bolts, Figure B-1. Check to make sure screws and bolts are tight. If rivets are used and they are loose, they may need to be drilled out and replaced.
 |
 |
| (a) | (b) |
| Figure B-1 Leg and Head Attachments |
|
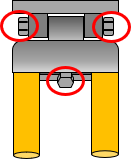
b. Extension Locks
Locks should secure extended legs firmly for all equipment used. A lock holding under the weight of an automatic level may fail for a total station. The failure may be slow affecting the instrument level, or quick resulting in equipment damage.
Locks types are generally screw or toggle, Figure B-2. Toggle locks can be adjusted as they loosen over time. Screw locks on older tripods may eventually not tighten sufficiently and many cannot be adjusted. If that's the case, replace the tripod.
 |
 |
| (a) Screw | (b) Toggle |
| Figure B-2 Extension Locks |
|
Locks on a tripod stored in a warm environment and used in cold conditions without acclimation may fail due to material contraction. After use in the cold, locks should be loosened before placing a tripod in warm storage. If not, material expansion may cause leg or lock deformation which may not be repairable.
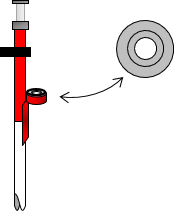
c. Tripod Shoes
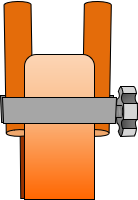
A tripod shoe attaches to a leg using screws, bolts, or rivets, Figure B-3.
 |
| Figure B-3 Tripod Shoe |
Tighten screws or bolts to prevent shoe wobble. Loose rivets may need to be drilled out and replaced.
d. Overall inspection
Material has particular characteristics affecting tripod performance. Things to inspect:
- Wood. Although largely fallen out of fashion because of their weight, many wooden tripods are still in use. The wood, especially at the extension locks can become flattened with repeated lock use. Chipped or cracked paint can allow moisture entry affecting smooth extension action.
- Aluminum. Aluminum is lighter than wood and less moisture susceptible. The material, however, can be dented or deformed. Aluminum tripods typically use riveted construction; loose rivets may or may not be able to be replaced.
- Plastic or fiberglass. Also lighter and more moisture resistant than wood, plastic and fiberglass are additionally non-conductive materials. Although they won't dent or permanently deform like aluminum, they can crack if manhandled roughly or hardware is over-tightened. Riveted construction has the same loose hardware issues as aluminum tripods.
With the tripod legs firmly planted and extension locks engaged, grasp the head and twist to check for stability. Wobble or deflection means a questionable instrument platform. As a tripod ages, it can wear to the point that it cannot provide a stable instrument platform, regardless how much its hardware is tightened. When that happens, instead of trying patchwork solutions, replace the tripod. A new good quality tripod is relatively inexpensive and cheap insurance considering its importance.
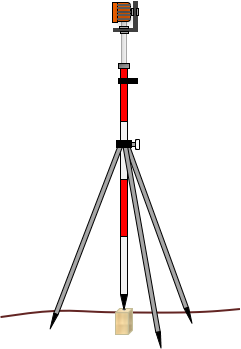
3. Pole-Mounted Bubble
Whether used to support a reflector for distance measurement, as a sight mark for angle measurements, or mounting a GPS unit, a pole depends on an attached circular bubble to be held vertical.
To check the circular bubble and adjust if needed, one of three methods can be used.
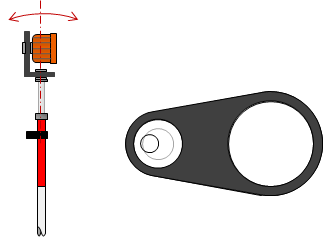
a. Adjusted rod bubble
Use a second adjusted rod bubble. Hold the bubble against the pole, center it, and check the attached rod bubble.
 |
| Figure B-4 Using Adjusted Bubble |
The amount the bubble is out is the total amount of error.
To adjust, tighten/loosen one or more of the bubble adjusting screw to center the bubble. The screws are generally located on the bottom of the bubble housing, Figure B-5.
 |
| Figure B-5 Adjusting Screws |
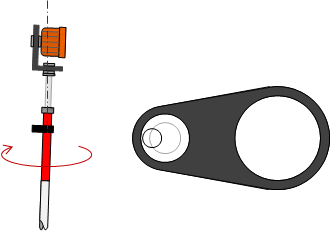
b. Pole tripod
Use a pole tripod to apply the principle of reversion following the procedure in Figure B-6.
|
(1) Insert the pole in a pole tripod and set it on a point. |
 |
|
(2) Adjust tripod leg lengths to center the circular bubble. |
 |
|
(3) Rotate the rod 180°. If the bubble stays centered, it's in adjustment. If it runs... |
 |
|
(4) ...bring it back halfway by readjusting the tripod leg lengths. This makes the pole vertical. |
 |
|
(5) To adjust, use the bubble adjusting screws to center the bubble. |
 |
| Figure B-6 Using a Pole Tripod |
|
c. Plumb bob
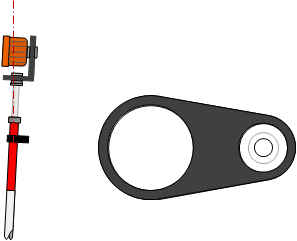
If an adjusted rod bubble or pole tripod are not available, another way to check and adjust the rod bubble can be done using a plumb bob, Figure B-7.
 |
 |
|
|
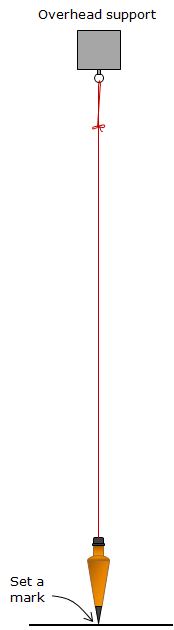
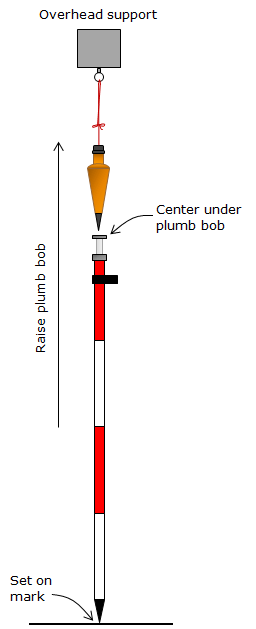
(1) Suspend a plumb bob from an overhead support. Set a mark beneath the plumb bob. |
(2) Raise the plumb bob just high enough to clear the pole. Place the pole on the mark and center under the plumb bob. | |
|
(3) If the bubble isn't centered, use its adjusting screws to correct it. |
||
| Figure B-7 Using a Plumb Bob |
||
4. Rod Bubble
A rod bubble is a separate bubble typically used to hold a level rod vertically. Because it is similar to a rod-mounted bubble, a few of its checks are related.
a. Use an adjusted pole mounted bubble
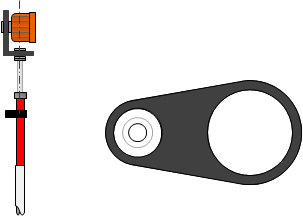
After a pole-mounted bubble has been adjusted, it can be used to check a rod bubble, Figure B-8.
 |
| Figure B-8 Using Adjusted Pole-Mounted Bubble |
With the pole bubble centered, the rod bubble is checked. The amount the bubble is outside the circle is the bubble error. Center the bubble using the adjusting screws on the bottom, Figure B-9.
 |
| Figure B-9 Adjusting Screws |
b. Plumb bob
The plumb bob method for checking a pole-mounted bubble, Figure B-7, can also be used for a rod bubble. Use a short section of range or reflector pole.
c. Calibrated door jamb
Use an adjusted bubble to find and mark a vertical door jamb section. The calibrated door jamb can used to check and adjust bubbles in the figure, Figure B-10.
|
|
| Figure B-10 Calibrated Door Jamb |
Check the door jamb periodically with an adjusted bubble.
Because they are inexpensive, it's a good idea to have an adjusted bubble in the office and not use it in the field. It can be used to check other pole-mounted and rod bubbles.
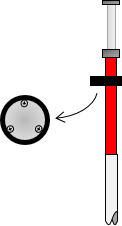
5. Tribrach
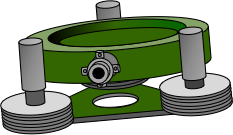
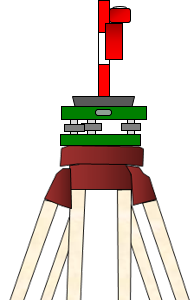
There are two types of tribrachs depending whether an optical plummet is included. One serves as the base of a total station or theodolite and does not have an optical plummet because it is built into the instrument. The second has a fixed, built-in optical plummet allowing it to be independently set up and leveled over a point, Figure B-11. It is generally used for interchangeable equipment such as targets and reflectors.
We'll refer to the first as Type A , the second Type B.
|
|
| Figure B-11 Type B Tribach |
a. Circular Bubble
The circular bubble is used to roughly level the tribrach. Both tribrach types have circular bubbles however there can be slight differences in how they are checked. For both types, the circular bubble is fixed and does not rotate with the instrument so we can't use the reversion principle to check its adjustment.
(1) Type A
Precisely level the attached instrument using its tube bubble. Check the circular bubble, Figure B-12.
 |
| Figure B-12 Circular Bubble Check |
The amount the bubble is not not centered is the error in the bubble. Center it using the adjusting screws. These are located either underneath the bubble housing or around the perimeter of the bubble. If they are capstan-headed screws, Figure B-13, use the correct size adjusting pin from the instrument's toolkit. If the pin is missing, select a thin nail or drill bit shank. Use one as close to the hole size as possible to avoid elongating the holes.
 |
| Figure B-13 Capstan Screws |
(2) Type B
Most Type B tribrachs can be attached to a theodolite or total station in place of the instrument's tribrach. The circular bubble can then be checked and adjusted as a Type A tribrach.
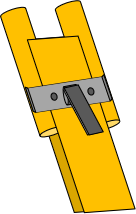
If the tribrach cannot be attached to a compatible instrument, then a calibration set up can be created as shown in Figure B-14(a). This requires a tribrach reflector adapter with a threaded mount stem, a short sight pole ("candy cane") or range pole section, and an adjusted rod bubble. Attach the pole to the adapter and lock the adapter in the tribrach. Attach the tribrach to a stable tripod setup. Holding the rod bubble against the pole, center it using the tribrach leveling screws, Figure B-14(b).
 |
 |
| (a) Parts | (b) Checking |
| Figure B-14 Short Pole |
|
The bubble error is the amount it is out of its circle, if any. Center the bubble using its adjusting screws.
This method can also be used for Type A tribrachs.
b. Optical plummet
(1) Type A
Because the optical plummet is built into the instrument rather than the tribrach, checking and adjusting it is discussed in Chapter D. Total Station Checks.
(2) Type B
Since the line of sight through the plummet includes the plummet mark and ground point, be sure to clear parallax. There are two focusing rings, one for the plummet mark and the second for the ground point. Use the same method to clear parallax as for an instrument's main telescope.
The optical plummet does not rotate so we can't use the reversion principle. However, checking the plummet is easy as long as a tripod with a plumb bob hanger is used. The optical plummet axis should be vertical when the tribrach is level. Because vertical is defined by gravity's direction, the plummet axis should also coincide with a freely suspended plumb bob.
To perform the check:
- Attach the tribrach to a tripod set up over a ground point.
- Suspend a plumb bob from the tripod's instrument attachment screw.
- Using the plumb bob, center the tribrach over the ground point, Figure B-15.
 |
| Figure B-15 Center Over Point |
- Level the tribrach using its circular bubble and leveling screws (do not extend/shorten tripod legs).
- Check to make sure the plumb bob is still over the point; shift the tribrach if not.
- Remove the plumb bob and sight through the optical plummet.
- If the plummet mark is on the ground point, no adjustment is needed.
- If the plummet mark is not on the mark, Figure B-16, it is maladjusted.
- The error is the distance between the marks.
- Use the optical plummet adjusting screws, Figure B-17, to move the plummet mark to the ground mark.
- There can be 1, 2, or 4 adjusting screws and they may be exposed or under a cover depending on the instrument.
 |
 |
|
| Figure B-16 Maladjusted |
Figure B-17 Adjusting Screws |
Because this check is dependent on the plumb bob, it is important that the correct hanger is used with the tripod. The hanger may be an insert or clip-in. Do not use a home-made hanger because the plumb bob might hang offset from the correct vertical line.