{KomentoDisable}
D. Best Preactices
1. Field Book Setup
Just as individual field notes must be organized, so must the field book itself. Data in the book should be easy to find and contact information provided should questions come up.
a. Title page
Use the right plate inside the front cover for field book identification. A field book used in class should include course number, crew member names and contact information, similar to Figure D-1.
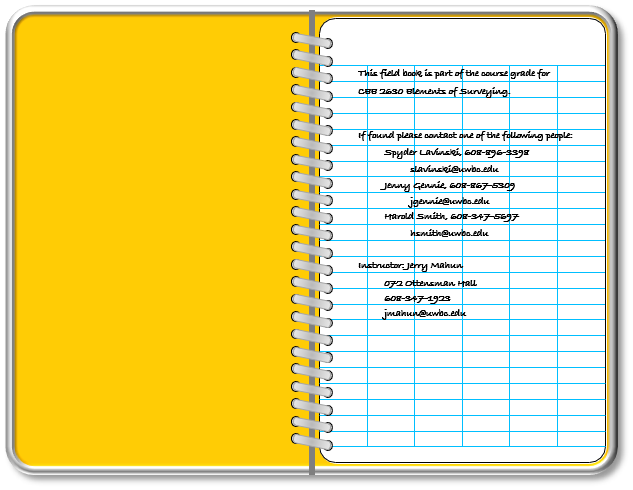 |
| Figure D-1 Field Book Identification Plate |
A project-based field book should include project information (name, ID, etc), company, crew chief, and appropriate contact information.
b. Table of contents
A Table of Contents (ToC) is begun on the left plate of page 1, Figure D-2. Projects are identified by page title and are added to the ToC as they are completed.
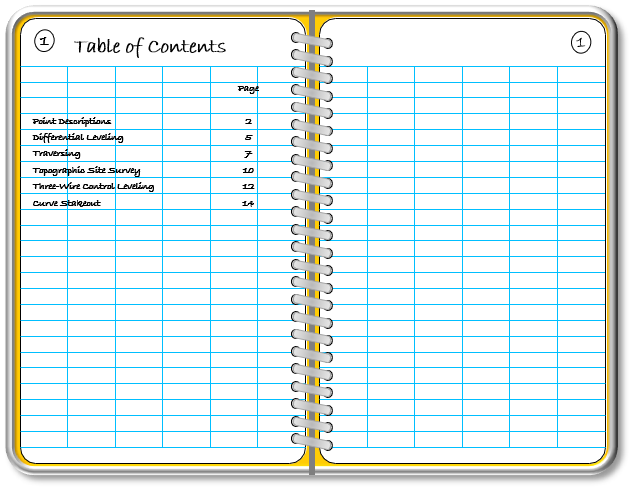 |
| Figure D-2 Table of Contents |
c. Use consistent page format
Surveying field operations are numerous and varied, consequently there are no specific rigid field note formats. Most Surveying textbooks show example note formats for different surveying processes which can be adopted or modified according to specific needs. Whatever format is used for a particular operation, it should allow for accurate data capture and be used consistently throughout the field book.
d. Do not remove pages or plates
Recording mistakes will happen and appropriate ways to deal with them are discussed in the next section. If an entire plate or page is riddled with errors, it is very tempting to remove it, especially when using a binder field book because page removal is easy. Pages are relatively easy to remove from a spiral bound field book also, while it is harder to do it cleanly with a sewn/glued book.
Sheets should not be removed because:
- Page removal is alteration of original data.
- The left plate is the back of the previous right plate and vice versa, Figure D-3. Removing a sheet can have unintended consequences.
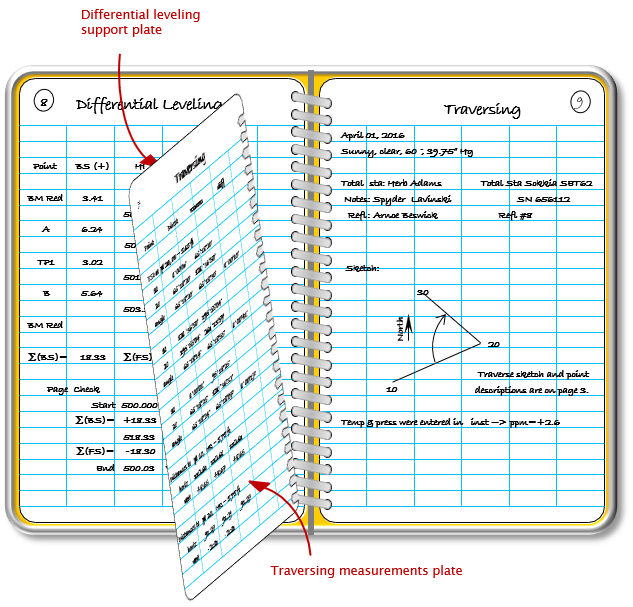 |
| Figure D-3 Page Removal Issue |
2. Taking Notes
Taking notes can be the most frustrating part of surveying because the note taker is subject to the elements and has a very small writing surface on which to work. Added to that are some common writing habits which must be modified.
a. Use a pencil with a hard sharp lead.
Field note paper is typically water resistant (not water proof) with a tighter bond than general writing paper. Ink has a tendency to smear as does regular hardness 2H pencil lead on this field note paper. For field notes, 4H lead is generally hard enough to minimize smearing, even in the presence of misting. Harder lead (6H and up) is too light and requires so much pressure that it indents the paper making recording on both sides problematic.
A simple test can be used to determine if a lead is hard enough: On the last page of the field book, print a line of numbers and letters. With a dry thumb, press down on and rub firmly across the printed line. If there is any smearing, go up one hardness level and try again. Slight smearing with a dry thumb can translate to substantial smearing in humid conditions.
Rather than carry a wooden pencil with a knife or sandpaper for sharpening, a mechanical pencil with a 0.5 mm lead size works well.
b. Legibility
Survey notes are printed, not written in script. Unlike normal writing, note keeping must be done slowly and deliberately to ensure legibility. Some common problems with hurried writing are 4s that look 9s (and vice versa), disappearing decimal points, and text which is hard to decipher.
c. Page and plate titles
A title allows the reader to recognize the type of survey data on the page. It also serves as the Table of Contents entry.
d. Record immediately
Measurements are recorded as they are made. They should not be written on scratch paper after which the "best" measurements are copied to the field notes.
e. Use reasonable and consistent accuracy
The measurements should be recorded to the resolution level of the instrumentation used. Most contemporary equipment have digital displays - record the values as displayed. Should analog readings be made, such as a reading a level rod, record to the smallest discrete division.
Keep in mind significant figures. Do not imply accuracy not attainable with the equipment (analog) nor degrade accuracy by leaving off significant zeros (analog or digital). For example, if a Total Station displays a reading of 45°10'00", do not record it as 45°10'; the 00" portion of the angle is significant. If a level rod reading is 4.10 ft, do not record it as 4.1 ft. Recall from the Significant Figures chapter written numbers convey both magnitude and accuracy.
When recording numeric values less than 1, always include the 0 to the left of the decimal point. With a hard lead, a decimal point may be easy to miss so .75 may be misread as 75. Including the 0 serves as a visual notice and does not change the number of significant figures.
f. Layout reflects measurement order
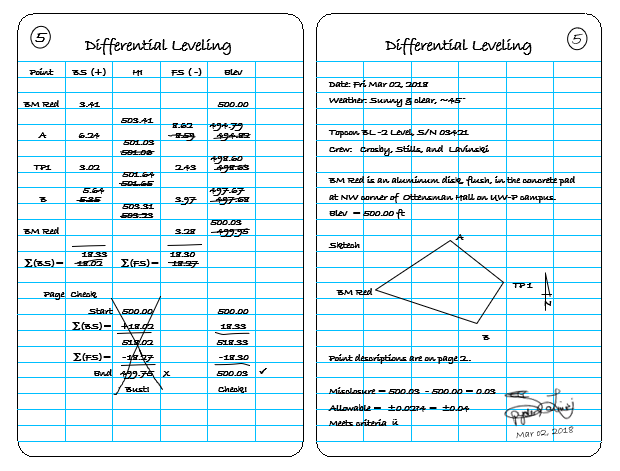
The layout of survey notes reflects the order in which measurements are made. Data collection generally runs top-down and left-right. For example, in the Differential Leveling notes (part of the left plate repeated here as Figure D-4), the circuit ran from BM Red to A to TP1 to B to BM Red (red arrow). The readings (and running calculations) go left to right across the plate between the points (blue arrow).
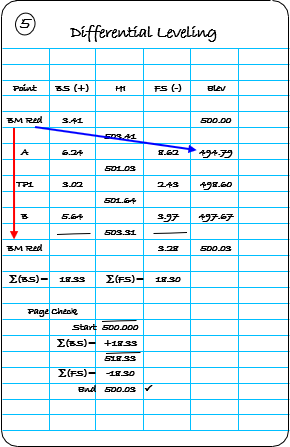 |
| Figure D-4 Layout Reflects Measurement Order |
g. Running calculations
In many survey operations, running calculations are made using the measurements. This allows the surveyor to check measurement consistency, identify errors, or check if final closure criteria has been met.
In the Differential Leveling notes, Figure D-5(a), the height of the instrument (HI) and point elevations (Elev) are computed as backsight (BS) and foresight (FS) readings are made. The blue arrows show the computation process to the first point.
In the Traversing notes of Figure D-5(b), a horizontal angle is the difference between the foresight (pt 30) and backsight (pt 10) circle readings, blue arrows. It is measured in the Direct and Reverse instrument positions to account for systematic instrumental error. For each direct and reverse measurement set, the difference is determined, red arrow, to check consistency.
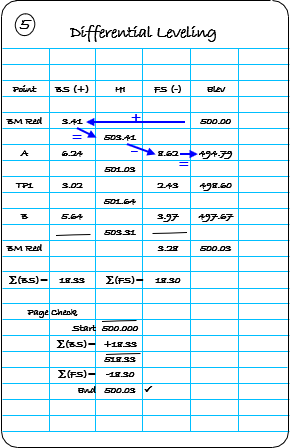 |
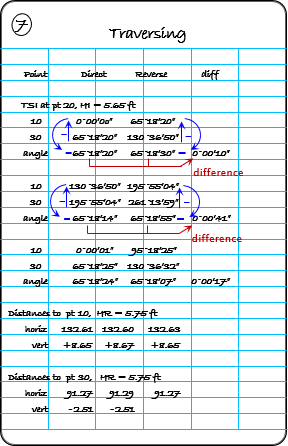 |
| (a) Differential Leveling | (b) Horizontal Angle Measurement |
| Figure D-5 Running Calculations |
|
Running calculations should be done immediately as data is collected.
h. Math Checks
Hand-in-hand with running computations are math checks. These help identify computational errors and potentially isolate measurement errors. Two different math checks are indicated in the Differential Leveling notes of Figure D-6:
- Page check, red, which verifies the overall running calculations,
- Closure check, blue, for overall measurement accuracy.
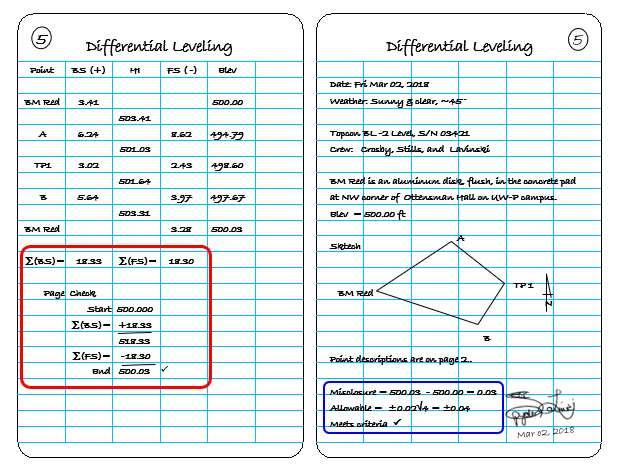 |
| Figure D-6 Math Check Examples |
i. Correcting mistakes
If a recording mistake is made, it should be struck out with a single line and the correction written above. For example, if 415.57 was recorded instead of 415.75, Figure D-7(a)-(c):
| Do not try to obliterate the incorrect value. | |
| (a) Wrong! | |
 |
Do not repeatedly over-write the wrong number with the right one. |
| (b) Wrong! | |
| Instead, single strike through the incorrect value and write the correct value above. | |
| (c) Right! | |
| Figure D-7 Correcting a Mistake |
|
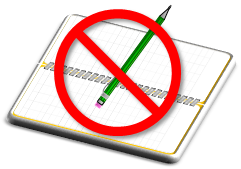 |
Above all, DO NOT ERASE in field notes, Figure D-8. A pencil is used for field notes to minimize smearing, not to allow erasing mistakes. A Surveyor's field notes are one of the few documents recorded in pencil allowed as evidence in court. An erasure is an alteration of original data and could affect credibility of the entire field book. |
| Figure D-8 Do Not Erase. |
Erasing is a very tough habit to break, especially since it's common in other aspects of writing and we've done it all our lives - we often do it automatically without giving it a second thought. An effective way to eliminate erasing is to remove the eraser from the pencil used for note keeping.
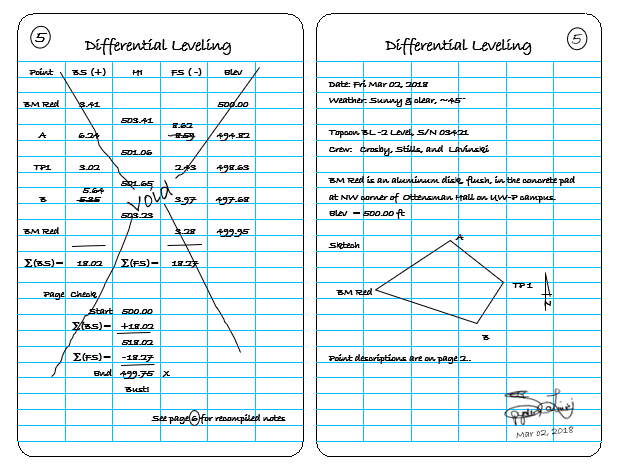
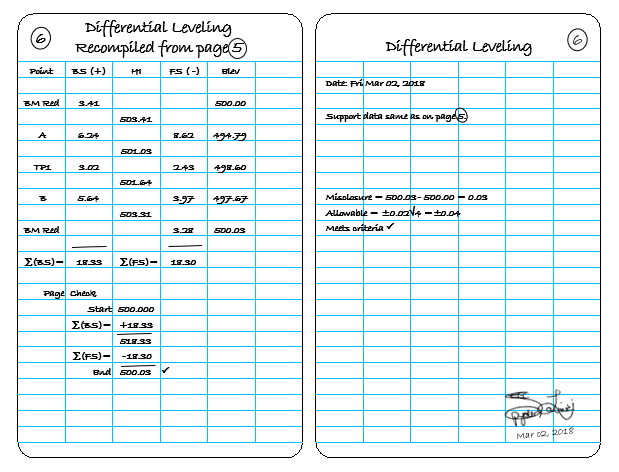
If there are multiple mistakes on a page (which can easily happen if a reading error is made and subsequent running calculations are affected) the entire page should be voided. Measurement data which can salvaged can be copied to a new page and the project completed on the new page if necessary, Figure D-9(a)-(c).
 |
|
| (a) Multiple Mistakes | |
 |
|
| (b) Void Entire Page | |
 |
|
| (c) Recompile Notes | |
| Figure D-9 Recompiling a Page |
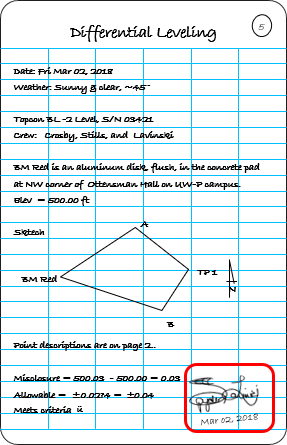
j. Sign and date notes
Upon completion, each field note page should be signed and dated by the note keeper, Figure D-10.
 |
| Figure D-10 Sign and Date Notes |